Ubuntu insights, Programming in groovy, java, et als!

Showing posts with label Linux. Show all posts

Wednesday, June 20, 2012

Design Patterns: Factory Method Pattern

/**
* A simple implementation of Factory Method Pattern
* using a real time CricketPlayer example
*/


//Base
public interface CricketPlayer{
    public String play();
}


//Subclass
class Bowler implements CricketPlayer{
    public String  play (){
        return "takes a wicket";
    }
}


//Subclass
class Batsman implements CricketPlayer{
    public String  play (){
        return "hits a six";
    }
}


//Factory class - contains the logic of instatiating players
public class CricketPlayerFactory{
    CricketPlayer player;
   
    public CricketPlayer getPlayerWho(String does){
        if(does.equals("bats"))
            player = new Batsman();
        else if(does.equals("bowls"))
            player = new Bowler();
        return player;              
    }
}


//Factory method implementation
public class FactoryImplementation{
    public static void main(String args){
        //create a factory
        CricketPlayerFactory factory = new CricketPlayerFactory();
        //ask factory to instantiate the player
        CricketPlayer player = factory.getPlayerWho("bats");
        //use the player
        System.out.prinln(player. play ());
    }
}

Design Patterns: Singleton Pattern

/**
* A simple Implementation of a singleton
*/
class MySingleton{
   
    static MySingleton singletonInstance;
   
   //****** instantiation ******


    static MySingleton getInstance(){
        if(singletonInstance == null)
            singletonInstance = new MySingleton();
        return singletonInstance;
    }
   
    private MySingleton(){
        //cannot be called public with new
    }


   //****** logic ******   
    ....
    ....
}


MySingleton.getInstance();


FYI, Points to remember

  • Singletons are bad. 
  • They are just glorified statics and hence against OOP principles. 
  • They should be rarely used. A classic example: for logging purposes.
  • Singletons are hard to unit test.
  • Also bad because it is NEVER a good practice to mix instantiation and logic in a single class. 


Friday, May 04, 2012

Setting up Conky & Lua-Widgets

Installing Conky-Lua widget/theme on Ubuntu

1) Install conky and conky-all from Ubuntu Software Center or via apt-get on terminal.

2) Unzip the contents of the tar.gz or zip of Conky/Lua theme submitted by the developer into some folder named Scripts.

Most importantly, the unzipped file will have a conky text file and a .lua file in it.

3) Ensure Nautilus Browser -> View -> Show hidden files option is enabled and create a hidden folder in your /home/Your_Username directory with the name .conky

4) Within the Scripts folder, search for file with .lua extension. This file contains the widget script. Copy the .lua file into the .conky folder.

5) Rename the left over text file in the Scripts folder to a hidden file named .conkyrc and place it in /home/Your_Username directory.


6) Open the .conkyrc file in gedit and edit the portion of the .conkyrc file which refers to the  widget location path i.e the .lua script path. In this case should point to

/home/Your_Username/.conky/someWidgetScript.lua

On terminal run command

conky

which will start the Conky theme/widget.


Installing Multiple Conky-Lua widget/themes on Ubuntu

By default, Running the conky command will invoke the .conkyrc text file at /home/Your_Username location and checks for lua scripts placed in the .conky folder.

In case of setting up multiple widgets you need to have multiple conky text files and multiple lua scripts.

Place all the .lua files in the .conky folder in the /home/Your_Username directory.

Let the text files remain in the Scripts folder but ensure that the configuration path in them points to their corresponding .lua scripts in the .conky folder. (as shown in step 6 above)

In terminal, run

conky -c /home/Your_Username/Scripts/ConkyTextFileScript1
conky -c /home/Your_Username/Scripts/ConkyTextFileScript2
conky -c /home/Your_Username/Scripts/ConkyTextFileScript3

Each of these will take the conky text file path with -c option and individually start the widgets.


PS: You might face issues if any of the above actions, like the path configuration (in step 6) is not done correctly. Also, This requires little bit of scripting knowledge to work your way around. In a nutshell, these are the minimal steps required to setup Conky-Lua Widgets on Ubuntu.


Saturday, April 28, 2012

Power Saving Tips on Ubuntu

If you are running 11.10 and suffering from excessive power consumption on your laptop/netbook, I insist upgradation to 12.04 immediately. In the latest 12.04 LTS release, the kernel bug relating to the excess power consumption has been fixed.

On 11.10, my laptop consumed a whooping 31 to 33 W of power. On 12.04, it has fallen down to 24 W. Further more, I've installed these three utilities which seem to have reduced the power consumption from 24 W to 16 W, which is pretty cool.


1) From Ubuntu software center, search for laptop-mode-tools and install it.


2) Install powertop which helps you assess the power consumption details and configure some of the processes. (sudo powertop on terminal to run it after installation)


3) Install jupiter, a tiny applet that runs on startup, a very useful utility that lets you set the mode to power consumption and also lets you configure the bluetooth and wireless options which typically consume a lot of power.


Installation of jupiter :
sudo add-apt-repository ppa:webupd8team/jupiter
sudo apt-get update
sudo apt-get install jupiter
sudo apt-get install jupiter-support-eee


4) If you are on a hybrid-graphics laptop, you can turn off your graphic card. In my case, this worked like a charm. 

echo OFF | sudo tee /sys/kernel/debug/vgaswitcheroo/switch 


However, the above command is not persistent and needs to run on every startup. 


Standard tips like keeping the brightness low, turning off wireless/bluetooth when not needed would also help.
I have abandoned using Ubuntu 11.10 from the past 3 to 4 months because of its excessive power consumption on my Dell Inspiron. Thanks to Precise Pangolin and these three utilities, I am back on Ubuntu now. :)


Hope this helps some of you battling with power consumption issues on laptops and netbooks running Ubuntu.

Thursday, March 08, 2012

Coffee with Linux #2 - The Shell

Generally, users interact with the Operating System by clicking on icons, menus and buttons. This is called Graphical User Interface (GUI). Apart from this, there is also an other way to interact with the computer using a command line interface (CLI) which is purely by typing in commands to get the task done. Think of it the DOS command prompt in the world of Windows. One can open Notepad application either by selecting it from the start menu or by simple typing in notepad on the windows prompt. In a parallel context, the command line interface on Linux that enables human-machine interaction is called 'The Shell'. That being said, it is not technically correct to draw a comparison between the Windows DOS prompt and the Linux shell because the shell is capable of doing much much much more than what can be done from a regular dos prompt on windows.

The shell has many variants, some of which are 
  • C Shell
  • Korn
  • Bash
  • Z shell
Bash is used as a default for many Linux distros that are available today. In almost all Linux distros you find an option called terminal emulator (or simply the terminal). The terminal is merely a window that runs the shell program within it.

Standard input & Standard output

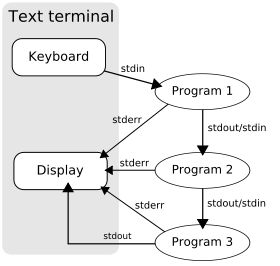
What you type in to the terminal on Linux is called the standard input and the output of the command typed in is called the standard output. This happens via streams. Whatever is typed in, is taken onto a stream (stdin) which is a continuous set of bytes, likewise the output is also written onto a stream (stdout) that is by default shown on the screen. You can redirect this stream, the standard output on screen onto a file or anywhere else. Example :

$ ls > outputOfLSCommand.txt


Speaking of streams there is a separate stream for carrying the error output (stderr). Likewise you can also redirect the standard input from a file instead of defaulting it to the keyboard.


Piping the output

Just the way the output is redirected, the user can also pipe the output. Piping generally happens when the output of one command is given as input to an other command. Example

$ ls | rev


In this command the output of list directories command as a String is given as an input to the rev (the reverse) command which displays the output text in a reversed way.

*********** End of Tutorial 2 ***********


See Introduction Tutorial 1: Coffee with Linux #1 - Head Start


Wednesday, February 29, 2012

Bypass the Linux Grub to retrieve Windows Bootloader

Rececntly I had messed up with the Linux partitions on my laptop because of which the grub rescue wasn't letting me login to any of my operating systems. This is a simple step that I came across to bypass the Linux grub to retrieve back my Windows Boot screen back. Simple yet helpful.

1) Insert a Windows 7 upgrade disc.
2) Enter boot menu to boot from CD/DVD.
2) Proceed to repair Windows. (Caution : Do not reinstall Windows)
3) Open command prompt
4) Type in
Bootrec.exe /FixMbr
which reports a quick reply reporting, "operation ended successfully"
5) Remove disc and Reboot from HDD.

Tuesday, February 14, 2012

Coffee with Linux #1 - Head Start

Introduction 

It is often a gigantic task for a newbie to grasp concepts of Linux, not because they seem nerdy but mostly because there are way too many facets to the OS and it is surrounded by a humongous number of other terms which usually tend to scare away a learner in the first glimpse. Most of the time, beginners find it hard to find a starting point to learn Linux. 

Coffee with Linux will be a series of blog posts which will touch base concepts at a very superficial level. The blogposts in this series will usually be the gateways for you to enter into the world of Linux. The series will eventually run into posts that will describe the usage of commands from terminal. The learning will not be in bookish order, it will rather be in the order of the things I learnt/learn/will learn. So let's get started!


Li'l history

Unix was an operating system started as an academic project, pioneered by the likes of  Dennis Ritchie and Ken Thompson, at AT&T's Bell labs during the late 1960s. It gained popularity and different communities and groups were picking up unix and developing their own versions of Unix.  One such version was Minix which was supposedly a minimal Unix version, which was written by Andrew S. Tanenbaum. Minix was used in universities to teach computer science. Linus Torvalds picked it up, contributed to the development of an open source Kernel and called it Linux. 


Distros

As Linux is open sourced, anyone can pick up the source code and develop a version of his own. Thousands of distributions have emerged since the last couple of decades. To name a few, Redhat, OpenSuse, Ubuntu, Lubuntu, Kubuntu, Bodhi Linux and TinyCore are some known distros. To know about the different distros of linux, visit  http://distrowatch.com 


Understanding the OS

An operating system typical has three layers. 


Environment (The Top Layer)
This layer in very raw terms deals with applications that interact with the user. Terms like KDE, GNOME and UBUNTU's UNITY fit in here. They are typically the desktop environments and Linux gives the user complete flexibility to use any of these desktop environments. If need be, the user can even chuck out this desktop environment layer and stick to the default command line interface. 

Example to Ring a bell : Desktop themes, icons, toolbars, etc.


Kernel (The Middle Layer)


Kernel is an abstraction layer that co-ordinates the applications with a system's hardware and resources. An operating system exists only because of its kernel which usually takes care of all the OS specific operations like process, memory and device management. It is completely 
written in C and can be downloaded at  http://kernel.org/

Example to Ring a bell : Running two or more applications at a time and multitasking on them.


System Resources (The Lower Layer)


File System, memory and all hardware specific physical matter come under this layer. 

Example to Ring a bell : The presence of a graphic card to play high end games. 


------------ End of tutorial 1 -----------


Tuesday, November 15, 2011

Solve Graphic Driver Errors & Unity 3D Display Issues in Ubuntu 11.10

Graphic card compatibility issues with Ubuntu are very annoyingly frequent during installation. I've been a sufferer of the same recently when my graphic card drivers crashed and Unity 3D failed to render correctly, Instead it reverted to Unity 2D version which pretty much sucks. Here are some insights into Unity panel issues w.r.t the non-availability or incompatibility of your graphic driver.

Test if unity is supported  :
Type in terminal

/usr/lib/nux/unity_support_test -p 

You need to get an output saying Unity is Supported : Yes. If you don't, there are things that need to be answered which of course will be, in the below steps.

How do you know if Unity 3D is running :
In the terminal, type in

echo "$DESKTOP_SESSION"

If the output of the above command is Ubuntu, Unity 3D is enabled and running.
If the output of the above command is Ubuntu-2D, Unity is running in 2D mode.

PS: Make sure you are logged into Ubuntu and not into Ubuntu 2D. Verify this prior to login.


Test if Graphic card is detected :
In the unity dash, search for system Info. The System info will show you Processor, Memory, Graphics and other details. If the graphics details displayed is empty, it means that either the graphic card installed is not recognized or you might not have installed a graphic driver at all.

Moving On :
There are three ways of looking at any issue relating to graphic driver installation.

1) Install default binaries provided by Ubuntu (FGLRX drivers) (or)
2) Install Open source drivers to get the graphic card detected & running (or)
3) You either install the ATI binaries from the official ATI site.

You must stick to only one among the above three aproaches, out of which the Second option to install third party open source drivers is the best in my opinion. Here I've explained the first two approaches in detail.

Prior to taking any of the above approach, run this command to install dependencies :

sudo apt-get install build-essential cdbs fakeroot dh-make debhelper debconf libstdc++6 dkms libqtgui4 wget execstack libelfg0 dh-modaliases

1) Install FGLRX drivers provided by Ubuntu (I don't recommend)
To install the FGLRX drivers, search the Unity dash for Additional Drivers, Click on the appropriate FGLRX driver suggested and activate it.

2) Install Open source Graphic Drivers (Recommended)
The below command will remove all traces of Ubuntu's default fglrx drivers (if installed).

sudo apt-get remove --purge fglrx fglrx_* fglrx-amdcccle* fglrx-dev*


Remove the existing xorg.conf 
sudo rm /etc/X11/xorg.conf


Reinstall the xorg.conf
sudo apt-get install --reinstall xserver-xorg-core libgl1-mesa-glx:i386 libgl1-mesa-dri:i386 libgl1-mesa-glx:amd64 libgl1-mesa-dri:amd64


Configure xorg

sudo dpkg-reconfigure xserver-xorg

Reboot the system
sudo reboot

The above series of commands are most important, necessary and typically are the installation steps involved in using open source Graphic drivers to detect your graphic card.

PS: These open source drivers worked spot on with my Dell system with an AMD Radeon™ HD 6470M - 1GB (For ICC) video card. And should hopefully do the job for you too :)


Saturday, November 05, 2011

Automount NTFS drives on Ubuntu

Well, here's for the lazy ones out there. I came across this simple tweak to fix the problem of manually mounting disks (either external/NTFS) on Linux.

If you have frequently accessed files placed on several drives or partitions that are external to Linux, you need to manually mount these partitions manually from Nautilus or terminal prior to accessing files/directories in them. To avoid this, you can change the contents etc/fstab file in such a way that they are auto mounted on startup.

Prior to editing the fstab content, you need to know the partition label of your drive. Partition labeling (alphabets followed by a number) is quite different in Linux when compared to Windows. Your NTFS partition might look something like sda2 or sda3.

For the geek

Step 1: Running the

fdisk -l

command will give you details of all the partitions like the one shown above.

Step 2: If you fail to decipher anything out of the above output, Just run the below command against the device names whose System column of the above output contains NTFS in it.

fdisk -s /dev/sda6

Running the above command will give you the size of the partition sda6 in bytes which gives you a better chance of identifying the drive (presuming that you might at least know the approx size of the NTFS drive you want to mount).

Step 3: Run the below command below 

sudo mkdir /media/Windows
sudo echo "/dev/sda6 /media/Name_of_Your_Partition ntfs-3g defaults,locale=utf8 0 0" >> /etc/fstab
sudo mount -a

which will add up the details of your partition to etc/fstab.

For the noob

1) Install mount manager via Ubuntu software center, open the app and identify the partition label of the drive to be mounted based on the disk size and partition details shown in it.

2) Hit Alt+F2 and type in
    gksudo nautilus

3) Open the file named fstab under etc folder of file system.

4) Add the below line to the file and save. 

/dev/sda6 /media/Name_of_Your_Partition ntfs-3g defaults,locale=utf8 0 0

Note: Replace sda6 by your partition label and Name_of_Your_Partition should be the name of your NTFS drive. 

Sunday, October 30, 2011

Ubuntu 11.10 - First Thing's First


 What I did after Ubuntu 11.10 installation, the journey so far!
  1. Installed Oneiric Ocelot (64 bit) with partitions spaces 50GB for Ubuntu root / and 150 GB for /home .

  2. Ubuntu restricted areas for audio and video codecs. (Can be installed either from Ubuntu software center or from the terminal using the
    sudo apt-get install ….

  3. Downloaded Launchy, an opensource keystroke launcher, my all time favorite system utility to easy index files. (Comes as a deb package by default, one can open the deb package with Ubuntu Software Center to proceed for installation or from the terminal using..
    cd .. //to the downloaded directory location
    dpkg -i packagename.deb
  4. Cairo Cock : Another personal favorite of mine for easy access. Cairo dock overrides few things that unity lack in terms with ease of access. Well, for everything else, you've the terminal. Nevertheless, I find Unity a lot more complete than what it was in Ubuntu 11.04. I personally like Unity, it is just a matter of breaking conventionality to realize the potential of what something new and innovative could offer.
  5. Chromium, a much better and faster web browser than Firefox.
  6. Rhythmbox, to manage audio. I am not a big fan of the music players suggested in the Linux world, although I haven't tried out all of them. The newer Winamp like interface is what I personally love. Have been looking around for such but again, Rhythmbox seems to be the better among the bad lot. (And nothing can beat itunes for managing music on my ipod. One reasons why I also have windows as a dual boot. All other ipod sync plugins provided by any of the Linux players suck.)
  7. VLC player for videos.
  8. Was also looking at installing Tweetdeck but still need to look through this as Tweetdeck requires Adobe AIR and sadly AIR has stopped its support for Linux compatibility. May be version 2.6 will do, but then, even Tweetdeck appears to have some installation errors on Ubuntu offlate.

Other stuff
Programming in Ubuntu has always been heaven, cannot really give you reasons why but I just love it on Linux!
  1. Installed Oneiric Ocelot (64 bit) with partitions spaces 50GB for Ubuntu root /, 150 GB for /home .
  2. Java and groovy for Linux.
  3. Eclipse Galileo with groovy plug ins.
  4. SCITE and scintilla, an open source text editor that I've been recently introduced to, highly powerful and capable of supporting many languages like C, C++, python, ruby, perl, et al. Highly customizable for a programmer and lot more powerful than the standard gedit of Ubuntu.
  5. Changed etc/xdg/autostart to startup apps like Launchy on Ubuntu login, so that I don't have to do it manually each time.
  6. I am also looking at auto mount of external disks that share space between Windows and Ubuntu to escape the manual labor each time at startup. A simple bash script or etc/fstab may be? Need to look through..

Well, That's it for a brief start of a long journey with Oneiric Ocelot.

Launch Applications on Ubuntu Startup

You can always add programs/applications to linux startup without having to launch them maunally, meaning, the application you wish for will launch itself automatically as soon as you boot into ubuntu after logging in.

For instance, let us say you are looking at adding firefox web browser to your start up list, all that is needed to be done is, to copy the firefox.dekstop file from user/share/applications folder to the etc/xdg/autostart folder.


Via Terminal :

  1. Ctr+Alt+T to open terminal
  2. Type in the following command and hit eneter
    sudo cp /usr/share/applications/firefox.desktop /etc/xdg/autostart

Via GUI :

  1. Hit Alt+F2, type in
    gksudo nautilus

    //This will ensure deliberate copy of the desktop file albeit the file permission issues if any.

  2. Browse through Filesystem -> usr -> share -> applications
  3. Copy the desired .desktop file (firefox.desktop in this case)
  4. Browse through Filesystem -> etc -> xdb -> autostart and paste it in the folder.
This will start firefox on ubuntu startup. Similar approach can be adapted for any other application installed.